The components
Among my assortment are plenty of gold pen funnels (a receptacle to hold the pen upright on a desk) and gold slimline center bands, but no gold writing tips. If I turn a pen sized for the regular flat slimline center bands, it will end up a little too skinny to fit neatly in the gold funnel, and the “comfort” style center bands are a little too big. The perfect fit is just between, and the beaded or “fancy” rounded slimline center bands are just the right size.
Because the writing tip is hidden inside the funnel, I selected a satin chrome tip and decided to turn a custom center band of wood. In another box of assorted pen blank cutoffs, I found a piece of dark dyed and stabilized maple burl. I wanted a small pop of color next to the creamy white maple pen body and hoped this would do it (Photo 1).

Make a center band
To make a center band, I mounted the small, dyed blank in my chuck jaws. As a remnant cut from a pen blank, the size was perfect for chucking. I decided not to switch out my number 2 jaws for pin jaws, opting instead to hold the blank with the inside bases of the jaws tightened around it. This works for drilling small objects like this center band where no lateral pressure is applied (Photo 2). I didn’t need the entire length of this blank for the band, so I only drilled about 3/4" into the blank with a 7mm bit held in a drill chuck in the tailstock.
In hindsight, I should have used a smaller bit because the 7mm bit used for pen drilling includes clearance for a brass insert tube. When there is no brass tube, the center band ends up being a little floppy on the twist mechanism. I knew this from experience, but I seem to have forgotten…again, sigh. Next time, I will use a 17/64" (6mm) bit.
Pressing ahead, I compounded my error by measuring the outside of the pen funnel. I should have measured the inside for an accurate finished center band and pen barrel size because I ended up using the same caliper measurement for the pen barrel diameter (Photo 3). This slightly-too-large size ended with the pen barrel initially fitting into the funnel before stalling out and wedging like a morse taper!
Not yet knowing the sticky problem ahead, I trued the end of the blank with a sheering cut with my skew chisel for a clean endgrain surface (Photo 4). Then I turned the carefully measured, slightly-too-large diameter with a peeling cut from my skew and outside caliper (Photo 5). I rounded the center band to a slight bead and sanded and parted-off at about 1/4" (6mm) in length.

Prep the brass tubes
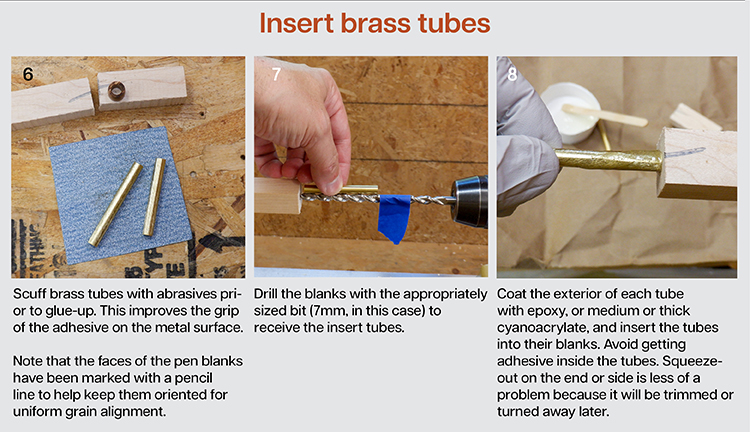
I sanded the brass tubes in preparation for gluing them into the pen blanks (Photo 6). I also marked the blank orientation so that I could keep track of the grain orientation through the turning and assembly process. I have overlooked that little detail in the past and have scrapped more than one set of blanks because of it!
Assemble tubes and blanks
I drilled the blanks with the 7mm bit. I prefer drilling my pen blanks on the lathe, using the same chuck holding technique I used for the center band. I also centerpunch the end of the pen blank. This lets me get the blank aligned to the point of the bit before tightening down the chuck jaws. I drilled through the short blank, and since the long blank gets a blind hole, I marked the appropriate depth on the bit with blue tape (Photo 7).
Aside from sanding, gluing (epoxying in this case) is my least favorite, but very necessary task in pen making. I slathered the epoxy on the sides of brass tubes before pressing them into the blanks while rotating the tubes (Photo 8).
Turn the barrels
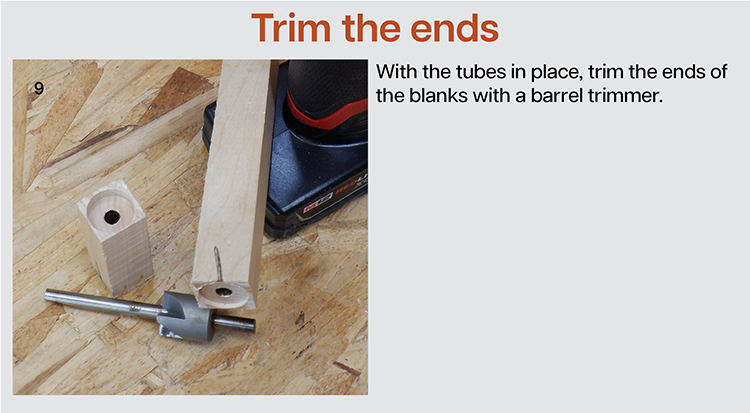
I patiently waited for the epoxy to cure enough to use the barrel trimmer. The epoxy label says five minutes, but the remaining mix in the paper cup still hadn’t cured, so I enjoyed a fifteen-minute coffee break before truing the tube ends with my pen barrel trimmer (Photo 9).
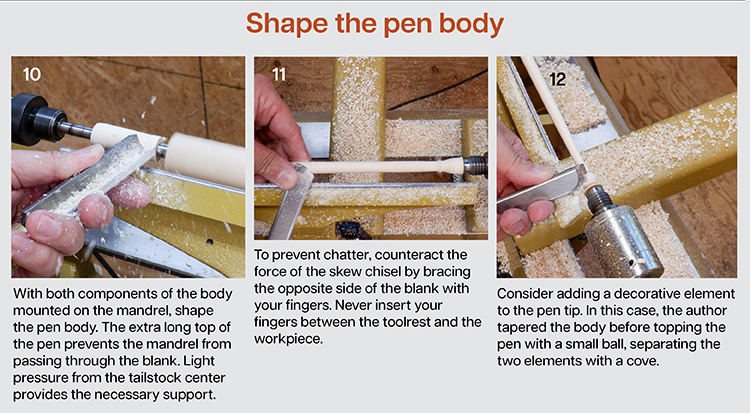
Turning the blanks is what I enjoy most in pen making (Photo 10). I mounted the blanks onto my adjustable pen mandrel. The tailstock end of the mandrel is inside the long blank hole, probably most of the way, but I didn’t check to see if it bottomed out. I haven’t found that it matters since the headstock end pushes against the bushing. I don’t tighten the tailstock quill with a cheater bar either—snug is tight enough. To reduce chatter along the length of the long blank, I used my off hand to support the cut (Photo 11). At the tip of the long blank, I turned a small sphere as a decorative feature (Photo 12). I sanded the blanks on the lathe to 320-grit and applied a friction polish for a glossy shine.
Turn the base
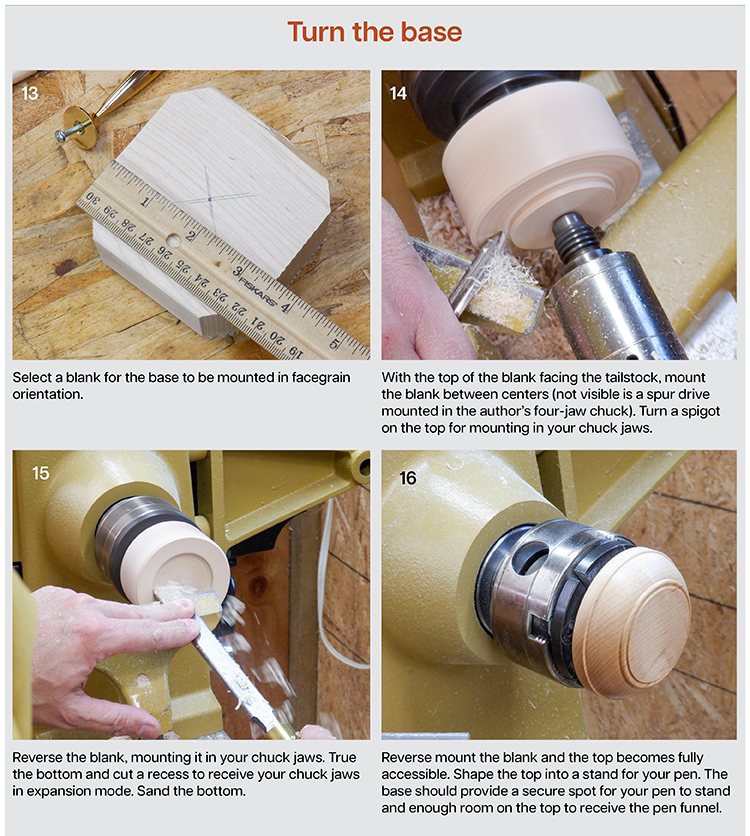
I started with a hard maple blank cut to 3-1/2" (9cm) square (Photo 13). I placed a 1" (25mm), four-prong drive center in the chuck jaws and mounted the blank between centers before turning a tenon on the tailstock end (Photo 14). I reverse-mounted the blank in the chuck jaws, trued the bottom, and turned a recess for holding the blank in expansion mode (Photo 15). With the recess turned, the bottom can be sanded and finished.
I remounted the blank by expanding the chuck jaws into the recess on the bottom. I flattened the top and turned the base into a pleasing shape, adding a small bead around the top (Photo 16). The top of the base can be sanded and finished.
Attach the funnel to the base
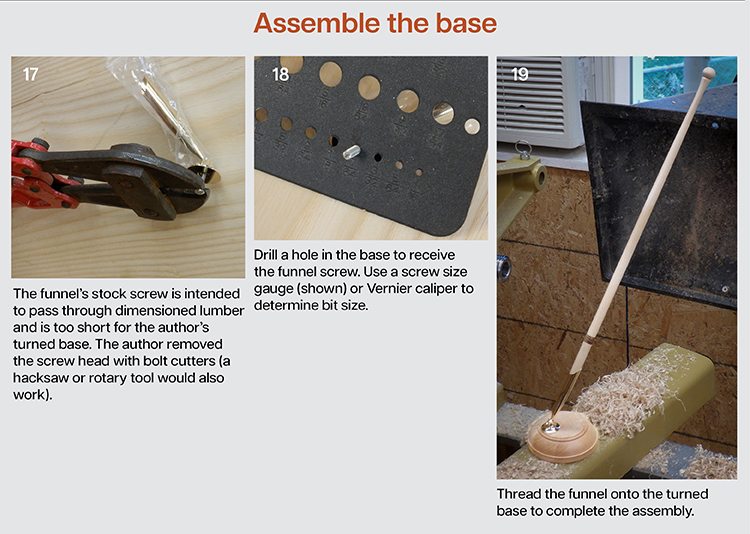
The last step is a hole drilled in the base to receive the funnel screw. The supplied screw would ordinarily thread through the underside of a dimensioned wood base and into the bottom of the funnel. However, the screw is too short to pass through my base, so I cut off the head to facilitate a different approach (Photo 17). I determine the appropriate drill bit, which is one bit size smaller than the diameter of the screw (Photo 18). I put a dab of epoxy in the hole in the base, thread the screw into the bottom of the funnel, then thread the other end of the screw with the funnel attached into the hole bored in the top of the base (Photo 19).
Assessment
Yes, it was the first of two pens made for the future bride. I wasn’t happy with the first one for several reasons. My custom center band had a sloppy fit, the length was embarrassingly long and, because I measured the center band diameter using the outside of the funnel, the pen body was too thick and didn’t fit properly in the funnel. The pen tended to bind, making it hard to remove and lifting the base off the table when I attempted to pick it up.
The do-over
I ordered an Artisan Desk Pen kit from Craft Supplies USA, which is what I should have done in the first place. These kits are inexpensive; I paid just under $4.00 for mine. It arrived a few days later and to the shop I went. I selected another—but shorter—piece of hard maple for the pen body.
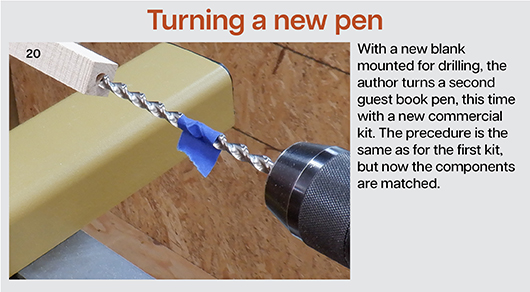
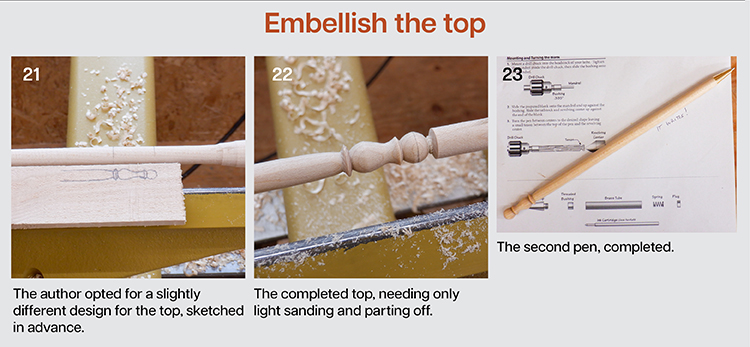
I drilled the hole in the blank using the same technique and 7mm bit (Photo 20). I mounted the drilled blank on the mandrel and reduced it to the diameter of the bushing. I also decided to add a little detail on the end, which I drew out on a piece of scrap (Photo 21). I turned the detail with my skew chisel and spindle gouge, and the little bit of chatter sanded off easily (Photo 22). I used friction polish on the wood while it was still on the mandrel, then parted off the excess above the detail at the end. I had only a little hand sanding to do at the very top and the pen body was completed.
I followed the assembly directions to the letter and was pleasantly surprised how easy it was to put together (Photo 23). I turned a second but larger base for the new desk pen using the same techniques as with the first base (see opening image).
After some thought of what to do with the first attempt—a slightly oversized desk pen—I decided to shorten it. My wife suggested that an angled end might look nice and save it, so I went with a 10-1/2" (27cm) length and made a 45-degree cut. While it gave a sleeker, modern look to the pen, I still favored the desk pen kit, which was presented to the bride—by my daughter, of course.
About the Author:
Rick Rich is a woodturner from Washington State. He is a member of the American Association of Woodturners (AAW), the Cascade Woodturners Association in Portland, Oregon, and a founding member of the Southwest Washington Woodturners in Vancouver, Washington.